How to Make a Scrunchie Taco Bag with Free Sewing Pattern

Learn how to make a Scrunchie Taco Bag with a free sewing pattern! Perfect for beginners and a great DIY project for spring. 🌸👜
Hello, everyone! This is my first FREE pattern of 2025—the Scrunchie Taco Bag! 👜
I’ve recently become a mini purse person! I used to love big totes, but after a shoulder injury, I can no longer carry heavy handbags on one side (Am I getting old? 😅). Since spring is here, I think this scrunchie-strap, half-circle “taco bag” is a perfect DIY project for the season! 🌸🌿
I hope you enjoy this fun and easy sewing project!
Let’s get started! Here is the free pattern for your own Scrunchie Taco Bag 💕
Patten Piece Inventory:
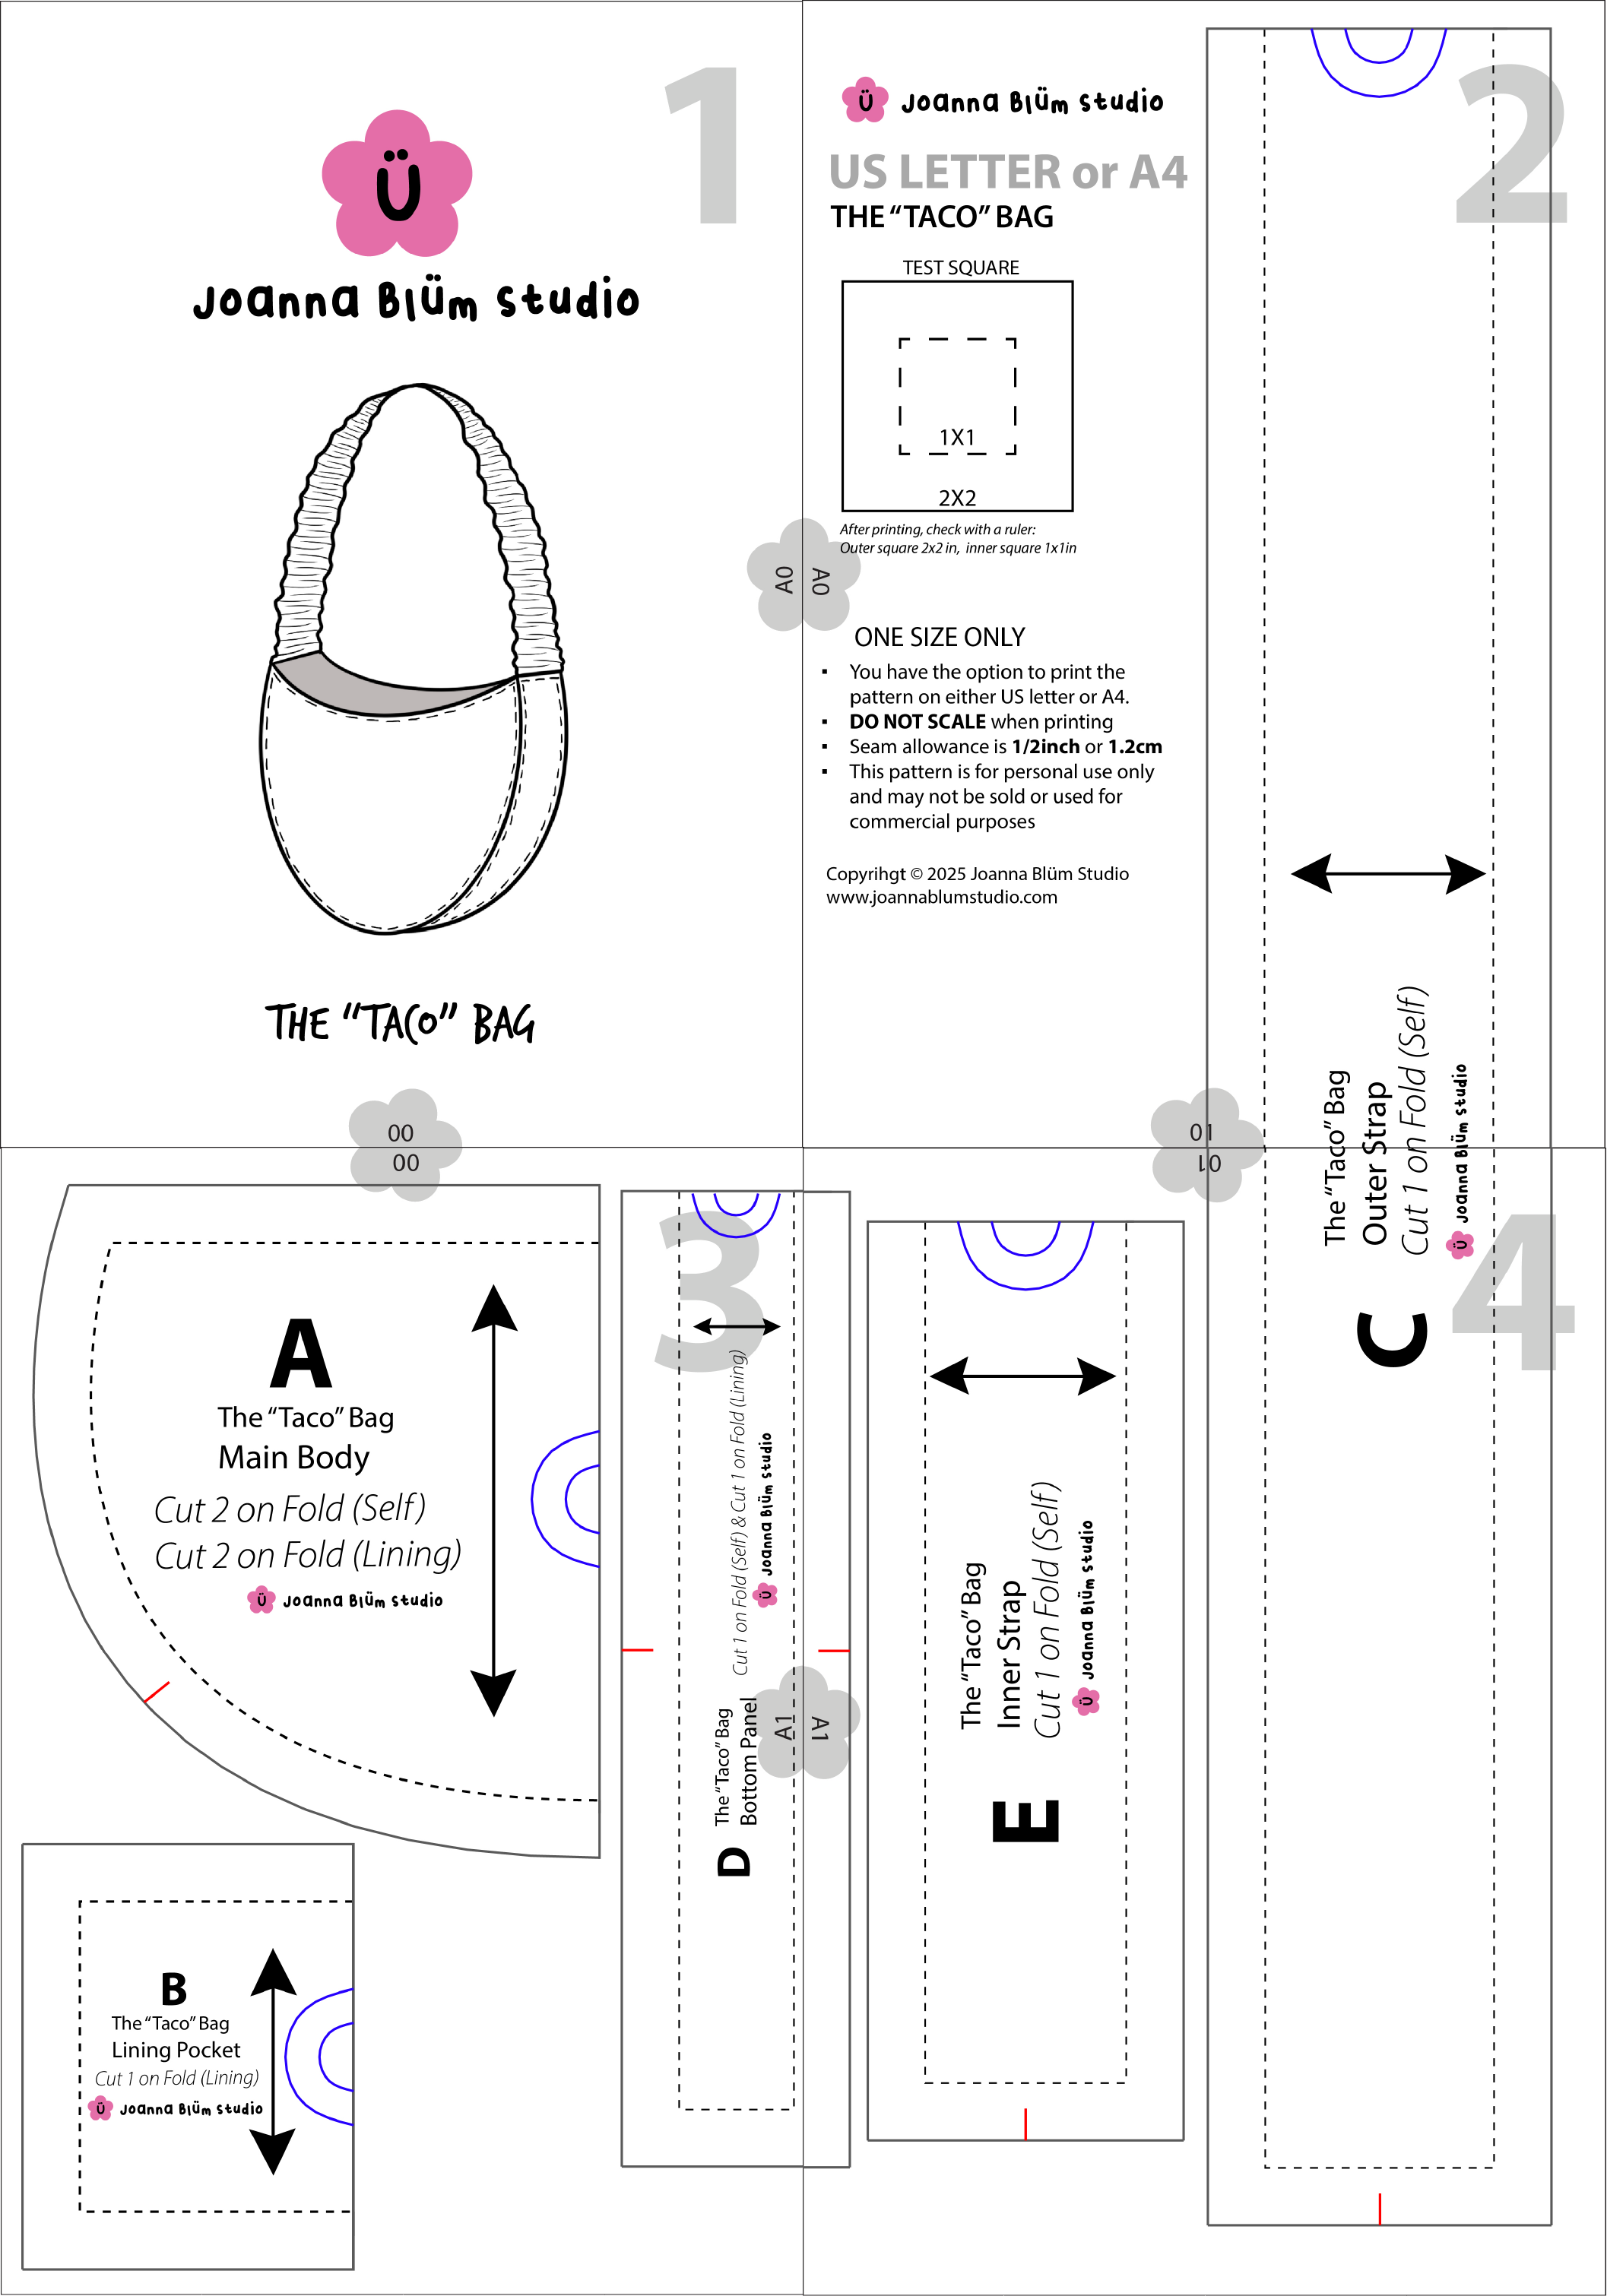
- A: Main Body – Self (Cut 2 on Fold) & Lining (Cut 2 on Fold)
- B: Lining Pocket – Lining (Cut 1 on Fold) (Optional)
- C: Outer Strap – Self (Cut 1 on Fold)
- D: Bottom Panel – Self (Cut 1 on Fold) & Lining (Cut 1 on Fold)
- E: Inner Strap – Self or Lining (Cut 1 on Fold) (Optional)
ℹ️ Inner Strap (Piece E) - Elastic vs. Fabric
- If you choose to use elastic instead of fabric for the inner strap, you do not need to cut piece E. Instead, you will need 1”(25mm) or 7/8”(22mm) wide elastic.
- If you use fabric for the inner strap:
- Thin fabric? Consider adding interfacing for stability.
- Thick fabric? You might prefer using lining fabric instead of self-fabric to avoid bulk.
Choose the best option based on your fabric type and preference! 😊
Fabric Requirements
- Main Body Dimensions: 8” (20 cm) wide × 5” (13 cm) high
- This project requires less than 1 yard (1 meter) of fabric, making it a great scrap-busting project! ♻️
- Outer Strap Consideration: If you want to avoid fabric waste, you can cut the strap in multiple shorter pieces and sew them together instead of using a single long piece.
Gather Your Materials:
- Your choice of self fabric
- Your choice of lining fabric
- Fabric marking pen or pencil
- Sewing clips or pins
- Sewing machine, needle, coordinating thread
- Tools for hand stitching
- (OPTIONAL) Sew-In Magnetic Snap Buttons
- (OPTIONAL) 1 Inch Knit Elastic
Sewing Instructions:
Optional Pre-Step : Prepare the Pockets and Snap Buttons for Lining
(Skip this step if you do not want lining pockets or snap buttons inside.)
-
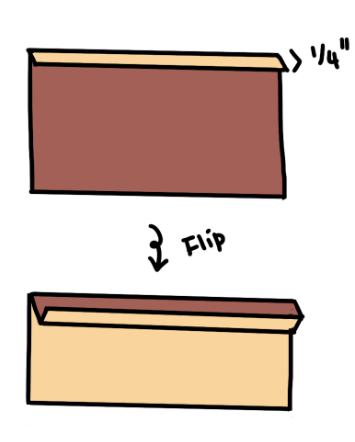
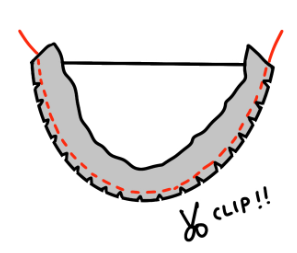
Fold the pocket edge 1/4”(0.6 cm) to the wrong side and press. Then fold 1/2”(1.3 cm) right sides together.
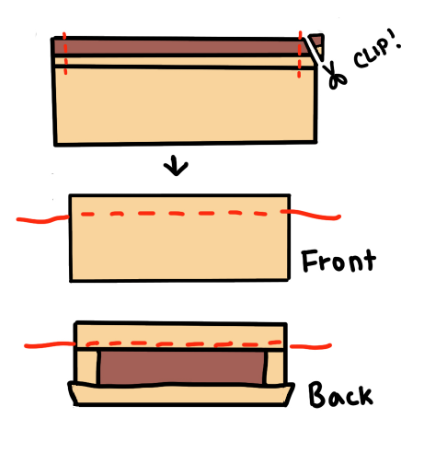
- Tack the folded edge 1/2”(1.3 cm) from the top, as illustrated.
- Clip the corner, then flip the pocket right side out.
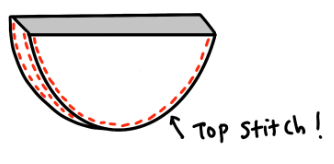
- Press the seam allowance flat.
-
Topstitch along the folded edge.
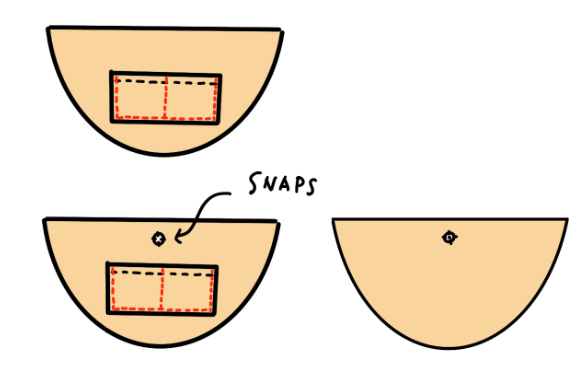
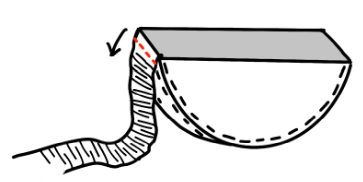
- Place the pocket on the desired area and edge-stitch around it to secure.
- Sew a divider line down the center of the pocket to create separate sections.
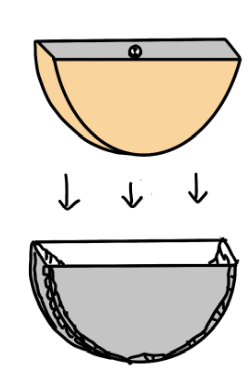
- Mark the placement for the snap buttons.
- Hand-sew the snap buttons securely.
Step 1: Prepare the Strap
Inner Strap
- Sew the inner strap (E) right sides together using a 1/2” (1.3 cm) seam allowance. Consdier adding interfacing if the fabric is too thin.
- Trim the seam allowance, then flip the strap right side out using a loop turner or paperclip.
- Press the strap flat.
- *(If using elastic): Skip 1-3, simply cut the elastic to your desired length. Suggested length: 13-14”(33 to 35.5 cm) + seam allowance
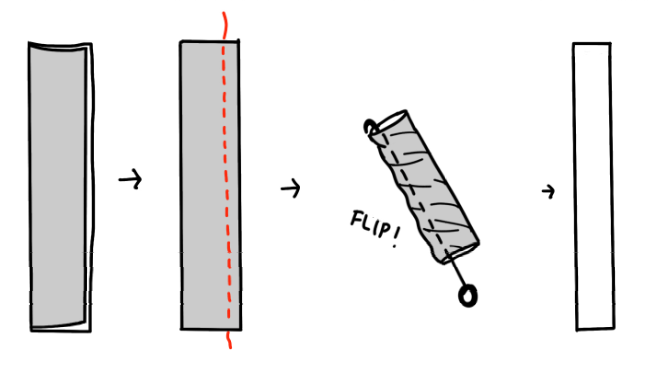
Outer Strap
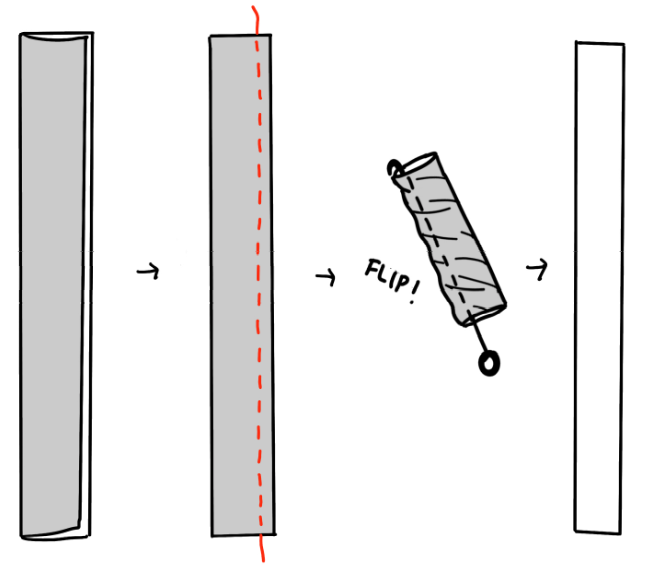
- Sew the outer strap (C) right sides together with a 1/2” (1.3 cm) seam allowance.
- Trim the seam allowance, then flip the strap right side out using a loop turner or paperclip.
Strap Assembly
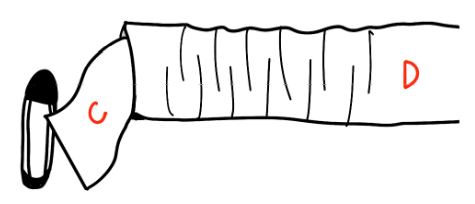
- Feed the inner strap or elastic through the casing of the outer strap.
- Adjust the ruching evenly or as desired.
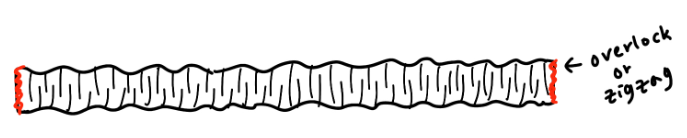
- Secure the ends with an overlock stitch or zigzag stitch.
Step 2: Assemble the Body
-
Sew the bottom edge of one self main body piece (A) to the self bottom panel (D) with a 1/2” (1.3 cm) seam allowance.
Tip: Clip notches on piece D and align them to A to help ease the curve while sewing. - Repeat this step for the other side.
- Optionally (but highly recommended), topstitch along the bottom panel seam.
- Repeat the same steps for the lining main body (A) and lining bottom panel (D).
Step 3: Assemble Everything Together
-
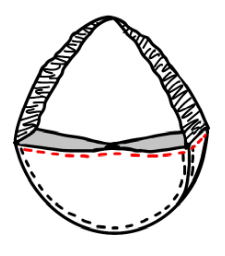
Place the strap at the top edge of the bottom panel (self side) and sew securely at 1/4” (0.6 cm).
The handle should be pointing downwards towards the bottom of the A-front piece.
-
Insert the lining piece inside the self piece, right sides together. Align the side seams.
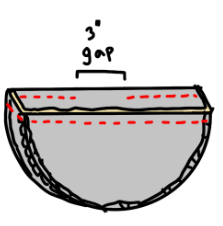
- Pin everything in place. Be sure to leave a 3” (7.6 cm) opening for turning the bag, preferably at the center back (CB) area.
- Using a 1/2” (1.3 cm) seam allowance, stitch around the top edge of the bag.
-
Turn your bag right side out through the opening and carefully press the top seam.
- Optionally, topstitch around the entire top edge of the bag or close the opening using a ladder stitch.
Give everything a good press and you’re all done! YAY. If you have any questions or are stuck with any instructions, please feel free to contact me anytime.

💕 Support Our Work:
If you’ve enjoyed our FREE pattern and beginner-friendly instructions, consider supporting our work by donating to our coffee fund! Your contributions help us continue to create and share more free patterns and sewing resources.
Buy Joanna Blüm Studio a coffee 💕
Thank you for your support! ☕💕
💕 Share Your Creations:
We’d love to see your creations! Remember to connect with me on Instagram @joannablumstudio and tag your photo with @joannablumstudio, #joannablumstudio and #tacobag!
Got Questions? Feel free to shoot us an email through the contact form